Recording camera stream and YouTube with OBS Studio
Here's how to use Open Broadcaster Software to record the stream or capture video from a web player. It's completely free and open-source (so it's not going to nag you about donating money, or try to sell you a Pro version or anything, you'll get all the features completely free!), and available for Windows, OS X and Linux.
1. Install OBS Studio

Head to
https://obsproject.com/ and download the OBS Studio (pick the right version for your operating system, of course ;))
Make sure to get the Studio, not the old "Classic" version (download link from the right side, not the left side!). These instructions only work for Studio and the old version is being depreciated already.
Install the program as any other, agree with the license (at least this one is pretty nice so no need to worry about all the legal text ;)) and launch the program. Time to set things up...
2. Settings

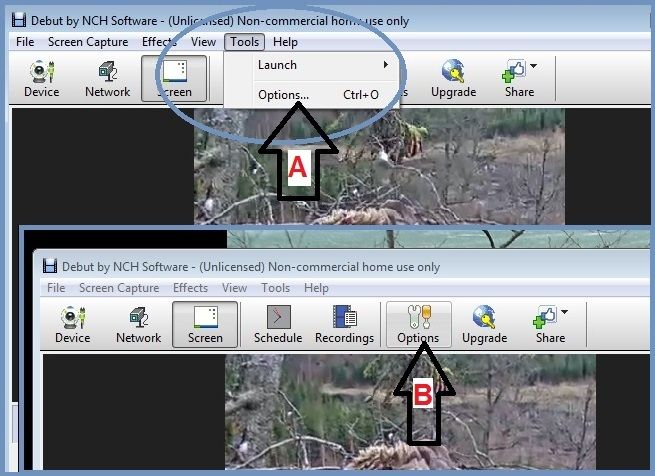
First thing to do is click on the "
Settings"-button.

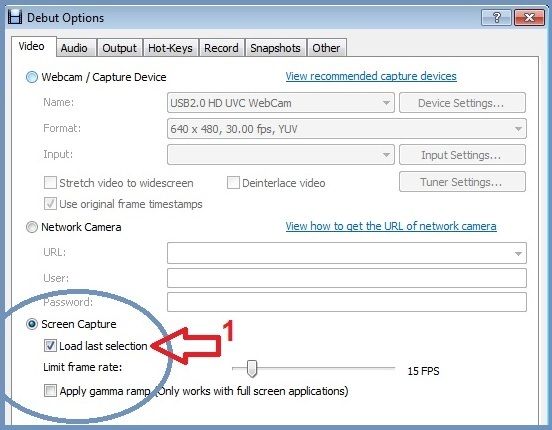
First set up your output options. We're mainly interested in the "
Recording" section here, you can leave the "
Streaming" part alone. The most important one here is the "
Recording Path", which is where your video files will be saved. I'm just saving them to my desktop here. You might want to change the "
Recording Quality", this will have a huge influence on how large video files you end with. (Advanced options will let you tweak this stuff in more detail, but you'll be just fine by choosing one of the quality presets).
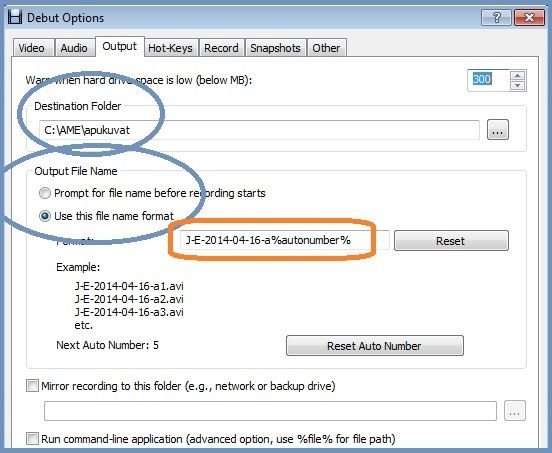
I'm setting the output format to MP4 here, that should work well enough both for keeping the videos around and uploading them to YouTube.
Notice the "
encoder" options here. What you have available will depend on your computer & which operating system you use. I'm using NVENC since I have a nVidia graphics card and allows me to use it to do the heavy work, but the basic idea is to switch any hardware encoder if available, and otherwise just try which one works best for you...

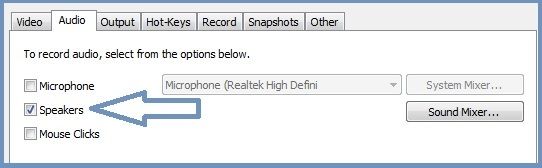
Next is the Sound settings, nothing too important here, but if you want slightly smaller file sizes, switch the "
Channels" setting to "
Mono".

Finally, on the "
Video"-tab, you can set the output resolution. Go for 1920x1080 for full details from the camera stream (on both canvas & output resolutions), if you wish to capture from YouTube window in your browser, or want smaller file size, you can set the output to 1280x720 instead.
3. Capturing the camera stream
Now that everything is set up, you'll want to add something to record...

In the "
Sources"-section, click the "
+" button to add new source, and from the popup list select "
Media Source".

You can give your new source a name so it's easier to remember what it does... Click
OK to proceed.

In the next window, untick the "
local file"-box and you should now see a field where you can add the stream location. The RTSP stream seems to work well here. ([url]rtsp://193.40.133.138/live/merikotkas[/url]). Click "
OK" to save this when you are ready.

That's all! It might take a few seconds for OBS to open the RTSP stream from camera. Once it's done and you can see the video in the preview, you are ready to click "
Start Recording".
Notice the "
Mixer" panel as well, if you mute mic & Desktop Audio, other things you might do on your computer while recording shouldn't end on the video...
4. Adding window capture for YouTube player in your browser & zooming/cropping sources
Maybe you prefer capturing from the YouTube player or something else instead? No problem, that's easy to set up as well.

In the "
Sources"-section click the "
+" button, and this time choose the "
Window Capture".
(If you want, you can add it to it's own scene like I did here. Just click the "
+"-button in Scenes section to add new one first...)

Select the correct window from the "
Window" popup. You'll also want to untick the "
Capture Cursor"-checkbox. Then click "
OK".
(Hint: if you move the eagle stream to it's own browser window, you can leave it open in the background to capture it, while surfing the web and reading the eagle forum freely without it affecting the recording...)

Next you'll want to crop the captured window so that only the video you want is visible. Right-click on the window source you created (or click the cogwheel icon), and select
Transform->
Edit Transform.

Tweak the numbers in the "
Crop" settings to hide everything outside of the video. You'll probably end with slightly different numbers than I have but it'll likely be something similar to this. You can just close this window when it looks like you have things the way you want.

The last thing you'll probably want to do is to make sure your cropped video source uses all available space on the video you are making. Easy, right-click on the source again, and select
Transform->
Fit to screen.
That should be it, hit the "
Start Recording"-button to record your video!
5. Multiple scenes and sources

You can also set multiple scenes, each with their own sources. Just right-click the "
+" button in "
Scenes"-section to create new ones. For example I've set up different scenes for capturing the RTSP stream and the YouTube player, and one additional one with more closely cropped & zoomed video. You could easily set up zoomed scenes for different areas of the nest or whatever might be useful. When recording, you can then just select a different scene on the fly.
You can also have many sources in one scene. The ones on top of the list will display above others, and you can move and resize each source separately. Add new text source to add text in your video, or image source to add a logo somewhere. Or maybe multiple video sources so you can record one video with all the different bird cameras? Or a closeup view in one of the corners?
The "Studio Mode"-button on right side switches you to split screen mode, where you can edit one scene while recording another one, and then just select next scene you want and hit a button to switch which scene is being recorded. Maybe a bit overkill for recording our eagles but useful to know anyway...