Page 3 of 12
Re: Adding images
Posted: March 15th, 2010, 8:35 pm
by oliv
[img

][/img]
Testing....
Not perfect, but soon I am a specialist

It´s ame who helped me.
Re: Adding images
Posted: March 15th, 2010, 9:48 pm
by oliv

Test again, but it is to much around the pic.

Re: Adding images
Posted: March 15th, 2010, 9:53 pm
by alice44
Re: Adding images
Posted: March 15th, 2010, 10:09 pm
by NancyM
Looks good to me too, oliv!

Some screen capture programs capture a little too much - but you can crop it out or leave it. If you are using Photobucket, there is a "crop" tool in the edit menu there.
Re: Adding images
Posted: March 16th, 2010, 9:03 am
by oliv
Good morning! I tryed to figure out by myself how to place the pic here from Photobucket. Ame told me aboute it later in the evening and after I have my morningcoffee and been out for some time I will show you! Yeees, I am happy like a lark

Re: Adding images
Posted: March 16th, 2010, 6:06 pm
by ame
oliv wrote:[img
][/img]
Testing....
Not perfect, but soon I am a specialist
It´s ame who helped me.
you seem to have too many 'img's here... if you copy the code from P-bucket that's enough. you don't need to write it yourself any more..
but is a great picture!! you've done it!


i agree with bocianny 100%: it's the picture that counts, the frames are not important. you can learn later to get rid of them, if you wish. this is a great start!

Re: Adding images
Posted: March 19th, 2010, 12:32 pm
by ame
how to capture pictures from Windows Media Player/ hur kan man skärmdumpa bilder från Windows Media Player: Miten Windows Media Player-ohjelmasta voi tehdä kuvakaappauksia
these instructions apply if you are using Windows Media Player, which is usually the first program people use when they begin watching our cameras.
dessa instruktioner gäller om du använder Windows Media Player, som är vanligast den första som används för at titta på våra kameror.
nämä ohjeet koskevat kuvakaappausten tekemistä, kun kameroitamme katsellaan Windows Media Player-ohjelmalla, mikä on tavallisin ensiksi käytetty ohjelma.
with Windows Media Player first select 'View full screen' by pressing with the mouse's left button on the little square in the lower right corner of the WMP-window, on the small arrow pointing upwards. then, if you wait for a while, the frames will disappear and you'll have only the camera-picture on you screen, nothing else.
med Windows Media Player du skulle först 'View full screen'. den väljer du genom at clicka med musen på ben lilla rutan som finns in lägre hörga hörnet med en liten pil up-åt. då har du bara kamerabilden på rutan, ingenting annat. då kan du vänta litet till ramerna försvinner.
ala ensin katsoa Windows Media Player'iä 'koko-kuvaruudulta' = 'View full screen'. sen voit valita napauttamalla hiiren vasemmalla napilla WMP-ikkunan oikeassa alakulmassa olevaa pientä ruutua, jossa on yläviistoon osoittava nuoli.
you can take a screen-capture by pressing 'shift-printscreen', that is: first press and hold down Shift-button and then press 'PrtScr'-button at the same time. this button is usually somewhere in the upper right section of your keyboard. then pres 'Esc'
to return to 'normal' screen.
sen tar du skärmdumpning genom at pressa 'shift-printscreen', det vill säga att först pressa på 'shift' och sen på samma tid 'PrtScr'. det finnas vanligen någonstans på up-höger på tangentbordet. då har du bildet på 'clippboard'. pressa 'Esc' för at få det 'normala' skärmet till hands.
ota kuvakaappaus painamalla 'shift-printscreen', ts. paina ja pidä alhaalla Shift-nappula ja paina sitten 'PrtScr'-nappia. sen löytyy yleensä jostain näppäimistön oikeasta yläkulmasta. paina sitten 'Esc', jotta pääset takaisin 'normaali'näyttöön.
then you should open Paint-program (or preferable open it beforehand). you can find it in All Programs - Accessories (at least in Vista which i have.) you should be able to find it if you press the Windows icon in the lower left corner.
sedan skulle du öppna Paint-program (eller hellre öppna den först). den finns in i All Programs - Accessories (åtminstone i Windows Vista som jag har.) du skulle hitta den om du pressar Windows-märket i låg-vänster hörnet.
avaa sitten Paint-ohjelma (tai mieluummin: avaa se jo etukäteen). se löytyy hakemistosta All Programs - Accessories (ainakin Vistass, joka minulla on.) sen pitäisi löytyä vasemmassa alanurkassa olevan Windows-merkin alta.
when you have taken the screen-capture and have Paint open, paste your picture into the Paint-page by pushing 'Ctrl-v' (press and hold down Ctrl, then push v at the same time). then you'll have your picture pasted on Paint.
då du har Paint öppet och tagit din skärmdumpning, sen ska du klistra den på Paint genom att pressa 'Ctrl-v' (först Ctrl-tangenten ner och sen på samma tid pressa v). då ska du ha din bild i Paint.
kun olet ottanut kuvakaappauksen ja avannut Paint-ohjelman, liitä kuvasi siihen painamalla 'Ctrl-v' (paina ja pidä alhaalla Ctrl ja paina sitten v). näin saat kuvasi 'liimattua' Paint-ohjelmaan.
next you'll need to save your picture. open 'File' in the menu on top and select 'save as'. then the program will ask you what filename to give to your picture. the extension (file type) will automatically be '.jpg' with the Paint, as it should be for Photobucket and LKF-posts.
sen skall du spara bilden. öppna 'File' på up-vänster i menu-balken, välg 'Save as' ('spara som'). sen ska programmet fråga dig vilket namn du vill ha för ditt datafil. extensionen (filtypen) skall automatisk bli .jpg med Paint, som det skall vara i Photobucket.
kuvan tallentamiseksi avaa menulistan vasemmasta kulmasta 'File', josta edelleen 'Save as' (tallenna nimellä). ohjelma kysyy, minkä nimen annat. tiedostotyypiksi ('jatkeeksi') tulee automaattisesti '.jpg', niin kuin pitää P-bucketia ja LKF.ia varten olla.
Re: Adding images
Posted: March 19th, 2010, 12:49 pm
by ame
the next step to get the images posted is to get an account in one of the photo-hosting site (Photobucket, Flickr,...)./
nästa steget är att öppna ett konto i någon 'photo-hosting site'.seuraavaksi kuvat pitää tallentaa johonkin 'photo-hosting-site'iin netissä (eli kuvapalveluun? vai mikä se mahtaakaan olla suomeksi?). sitä varten pitää avata itselle 'tili' tällaisessa palvelussa, esimerkiksi Photobucket'issa.
how to open an account in Photobucket/hur skall man öppna ett konto' i Photobucket/miten avataan Photobucket-tili.
to be able to open an account in Photobucket you'll have to have an e-mail-address (but you have it; otherwise you could not be a LK-member). you can find Photobucket e.g. by googling it or in this address:
http://photobucket.com/
för att kunna öppna ett konto skulle du först ha en e-mail-address (men det har du väl; annars kunde du inte vara LK-medlem). du kan hitta Photobucket t.ex. med Google eller här: http://photobucket.com/
Photobucket-tilin avaamiseksi tarvitset sähköpostiosoitteen (mutta sehän sinulla on; ethän voisi olla LK-jäsen ilman sitä). voit etsiä Photbuckit Googlella tai se löytyy myös osoitteesta: http://photobucket.com/
on top of the first window which opens there, after the Photobucket-logo you'll see a blue bar with the text "Join now". press the bar with the left mouse-button. a new window opens, and there you should write your 'username' and twice 'password', which both you can choose yourself. (it's maybe agood idea to write them down somewhere.) then press 'Next step'.
(after this i'm trying to remember how it goes on, i can't simulate it further. sorry if i make some mistakes... ) in the next window there are spaces where you write your name and other personal information. answer the questions and then it should be ok. i guess that with other photo-hosting sites the procedure is similar.
på toppen av det första fönstret som öppnas, i den blåa balken efter Photobucket-logo säger det: "Join now!". pressa på den med vänstra musknappen. det öppnas ett fönster där du ska skriva ditt 'username' och sen den 'password' som båda du kan välja själv, two gånger. (det är kanske bäst att skriva dom båda någonstans...) sedan pressa "Next step". (efter detta måste jag försöka minnas hur det går vidare... jag kan inte 'simulera' vidare. förlåt om jag gör några fel nu...) det öppnas ett fönster var du ska ge ditt namn och andra personliga information. svara frågorna och sen skulle det vara ok. jag tror att med andra 'photo-hosting sites' är proceduren liknande.
seuraavaksi avautuvan ikkunan yläosassa Photobucket-logon jäljessä on sininen palkki, jossa on teksti "Join now!". paina palkkia hiiren vasemmalla napilla, jolloin seuraavassa ikkunassa kysytään käyttäjätunnustasi ('username') ja kahdesti salasanaasi ('password'). molemmat voit valita itse. (voi olla hyvä ajatus kirjoittaa ne muistiin jonnekin.) paina sitten ruutua, jossa lukee 'Next step' (=seuraava askel). jatkoa en voi kokeilla itse vaan yritän muistella miten jatko sujui... anteeksi mahdolliset virheet..) seuraavassa ikkunassa kysytään nimeäsi ja muita henkilökohtaisia tietoja. vastaa kysymyksiin niin asian pitäisi olla selvä. muissa kuvapalveluissa on luultavasti samanlainen rekisteröityminen.
now that you have opened your account, i think it is a good idea to open a new album daily for the pictures you upload each day. otherwise there may soon be a chaos in your account.
if your have a different album for each day, you may also use 'same names' for files daily, like 's1', 's2', 's3',... for the first, the second, the third etc. 'siga'picture, and 'k1', 'k2', 'k3'... for for the first, the second, the third etc. 'kotkas'picture on that particular day.
när du har ditt konto öppet, tror jag att det är klokt att öppna ett nytt album för varje dag för dina bilder. annars kan det lätt bli kaos i ditt konto.
med dagliga album kan du också namnä dina bildfil med 'samma namn' varje dag, liksom 's1', 's2', 's3',... för den första, den andra, den tredje och så vidare 'siga'bilden på den dagen, och 'k1', 'k2', 'k3'... för den första, den andra, den tredje och så vidare 'kotkas'bilden på den dagen.
kun olet avannut tilisi, on mielestäni hyvä ajatus avata päivittäin uusi albumi sen päivän aikana palveluun ladattaville kuville. muuten tilillesi voi helposti tulla kaaos.
jos joka päivällä on oma albumi, voit myös nimetä kuvasi 'samoilla nimillä' päivittäin, tähän tapaan: 's1', 's2', 's3',... jne. sen päivän ensimmäiselle, toiselle, kolmannelle jne 'siga'-kuvalle, ja 'k1', 'k2', 'k3'... jne. sen päivän ensimmäiselle, toiselle, kolmannelle jne 'kotkas'-kuvalle.
keyword SearchPhotobucket
Re: Adding images
Posted: March 19th, 2010, 1:20 pm
by ame
here's the advice how to upload pictures into Photobucket and then how to post a message on LKF with the images. /
här finns instruktioner om hur kan man ladda upp bilder i Photobucket, och hur man kan sen posta ett meddelande med bilder på LKF.tässä ohjeet kuvien lataamiseksi Photobucketiin ja niiden liittämiseksi foorumiviesteihin.
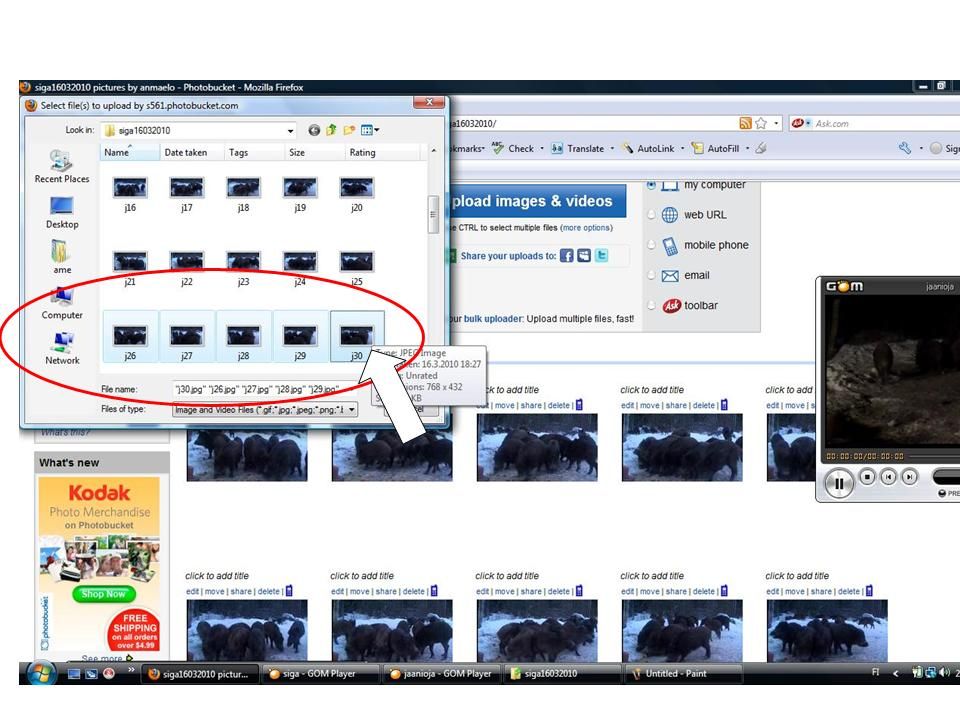
first you log-in into Photobucket. it might be a good idea to create separate albums for you different pictures: one album for
siga-pictures, another for
kotkas-pictures etc., maybe at least one album for each day you are uploading pictures, because once you get started, there will be a
lot of pictures! you can also first create an album for each year's
siga-pictures and under that title an album for each day's
siga-pictures, and similar albums for
kotkas-,
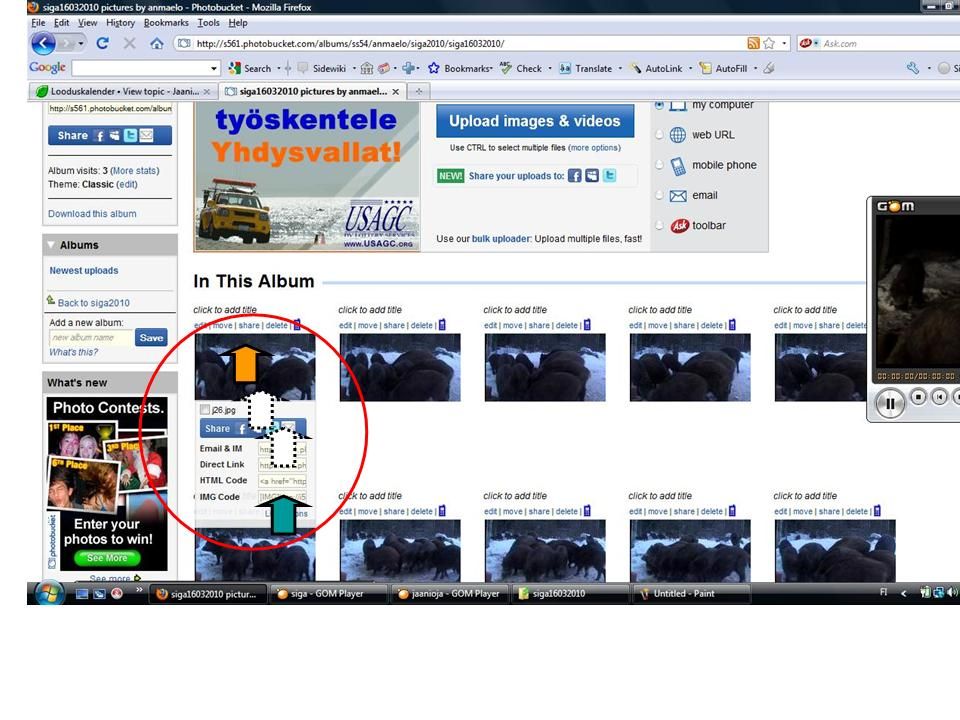
hyljes- etc. pictures... in the picture below the album name is circled with a green line.
nu skall du logga dej i Photobucket. allt först är det kanske ett bra idé att bilda olika album för dina olika bilder: ett album för siga-bilder, ett annat för kotkas-bilder osv., kanske åtminstone ett album för varje dag, föratt först du har suttit dig i gång då ska det bli mycket bildar! du kan också göra som här i denna bild: först ett album för detta årets siga-bilder och i detta album ett album för varje dagen siga-bilder, och ett likadant för kotkas- och hyljes-bilder. du ser album-namnen här i denna bild inringad med grönt.
kirjaudu aluksi Photobucketiin. aivan ensimmäiseksi on ehkä viisainta luoda eri albumit erilaisille kuville: yksi siga-kuville, toinen kotkas-kuville jne., ainakin oma albumi kunkin päivän kuville erikseen, sillä kunhan pääset alkuun, kuvai alkaa tulla paljon! voit tehdä myös kuten tässä: ensin albumi tämän vuoden siga-kuville ja sinne albumit kunkin päivän siga-kuville. samankaltaiset albumit voit luoda kotkas-, hyljes- jne -kuville. ao. kuvassa albumin nimi on ympäröity vihreällä viivalla.
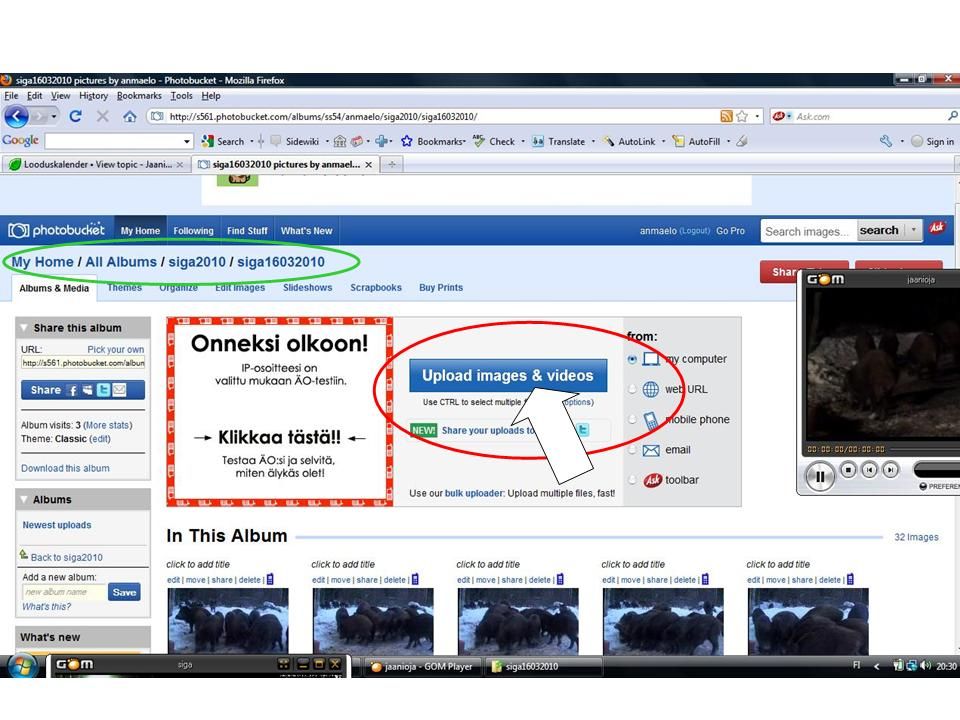
in the above picture you see the blue bar with the text "Upload images & videos" circled with a red line. press it with the left button of the mouse. a window with text "Select files to upload..." opens.
i bildet där uppe ser du den stora blåa balken "Upload images & videos" in ringad med rött. pressa på den med musens vänstra knapp och ett förster öppnas: "Select files to upload..."
yo. kuvassa näkyy sininen palkki, jossa on teksti "Upload images & videos" punaisella viivalla ympyröitynä. paina sitä hiiren vasemmalla näppäimellä, jolloin aukeaa uusi ikkuna, jossa on teksti "Select files to upload...".
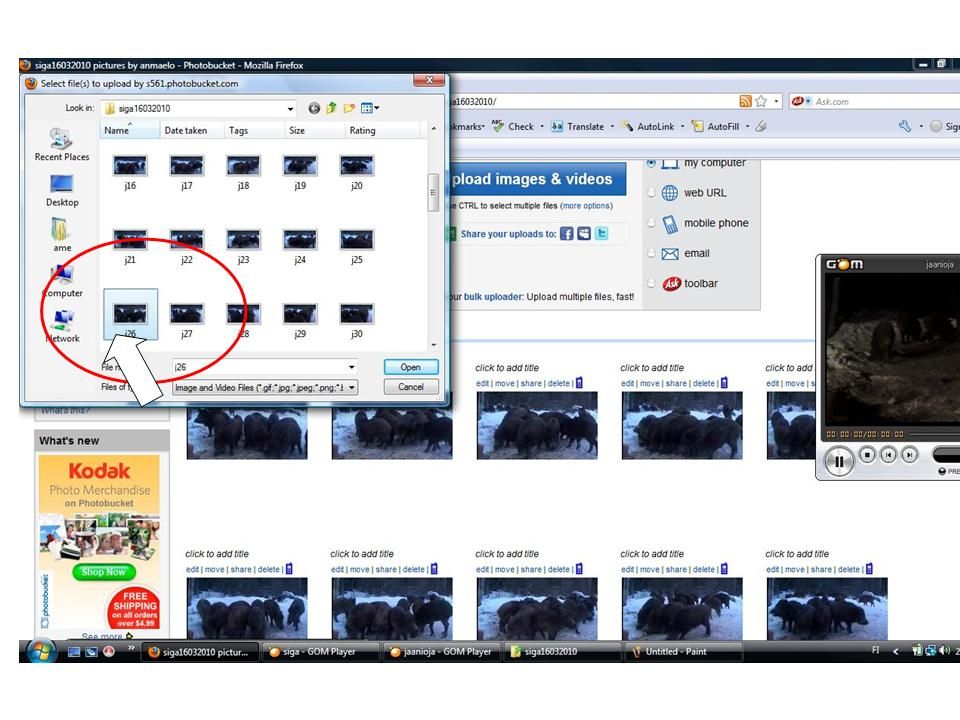
first you should look for up there the file where your picture files are located. then you should press on the icon of your picture-file, and then press 'open' in the lower right corner. then your picture begins to be uploaded into Photobucket. it may take some time...
först skulle du sökä där på toppen den mappen var din fotofil finns. sen pressa på bildfilens ikon och sen pressa på 'open' i lägra högra hörnet. då börjar din foto bli laddad opp i Photobucket. det tar lite tid...
ensin pitää etsiä omasta tietokoneesta se hakemisto, johon olet tallentanut kuvasi. valitse sieltä haluamasi kuvatiedosto näpäyttämällä hiiren vasemmalla napilla haluamaasi tiedostokuvaketta ja paina sitten 'open'-nappia oikeassa alakulmassa.
if (and when!) you wish upload many pictures, you can select then at the same time by pressing and keeping first Ctrl-button down and then pressing with the mouse button on the icons of the pictures one by one, or by first pressing on the first picture and then pressing on the last you want to select with the Shift-button down. then you can un-select individual picture by pressing on them with Ctrl-button down. -i have noticed that more than 10 pictures at the same time takes an awful long time to upload, and may fail altogether.
om (och när!) du har många bilder du vill upload, du kan välja dem på samma gång med att pressa med musen på varje ikon med Ctrl-knappet ner. eller du kan först pressa med musen den första bilden och sen pressa på den sista bilden som du vill ha med Shift-knappen nerpressad. sen kan du plocka bort individuella bilder genom att pressa på ikonen med Ctrl-knappen nedpressad. -jag har märkt att mera än 10 bilder blir alltför långsamt att laddas på samma gång, om det ens lyckas.
jos (ja kun!) haluat aldata useampia kuvatiedostoja yhdella kerralla, valitse haluamasi painamalla kunkin kuvatiedoston ikonia hiiren vasemmalla napilla pitäen samalla Ctrl-nappi alhaalla. toinen tapa on valita ensin ensimmäinen tiedosto näpsäyttämällä sitä hiiren vasemmalla napilla ja sitten Shift-nappi alaspainettuna viimeistä kuvaikonia. sen jälkeen voit poistaa valintoja näpäyttämällä yksittäisiä ikoneja Ctrl- nappi alaspainettuna. - kokemukseni on, että yli 10 kuvaa kerralla latautuu aivan liian hitaasti, ja usein lataus jopa epäonnistuu.
Re: Adding images
Posted: March 20th, 2010, 5:59 am
by alice44
Ame congratulations for the hard and useful work

Re: Adding images
Posted: March 21st, 2010, 1:56 pm
by ame
then you'll see the title: "Add Titles, Descriptions and Tags Individually".
sen ser du titeln: "Add Titles, Descriptions and Tags Individually". :
seuraavassa ikkunassa on otsikko:"Add Titles, Descriptions and Tags Individually".
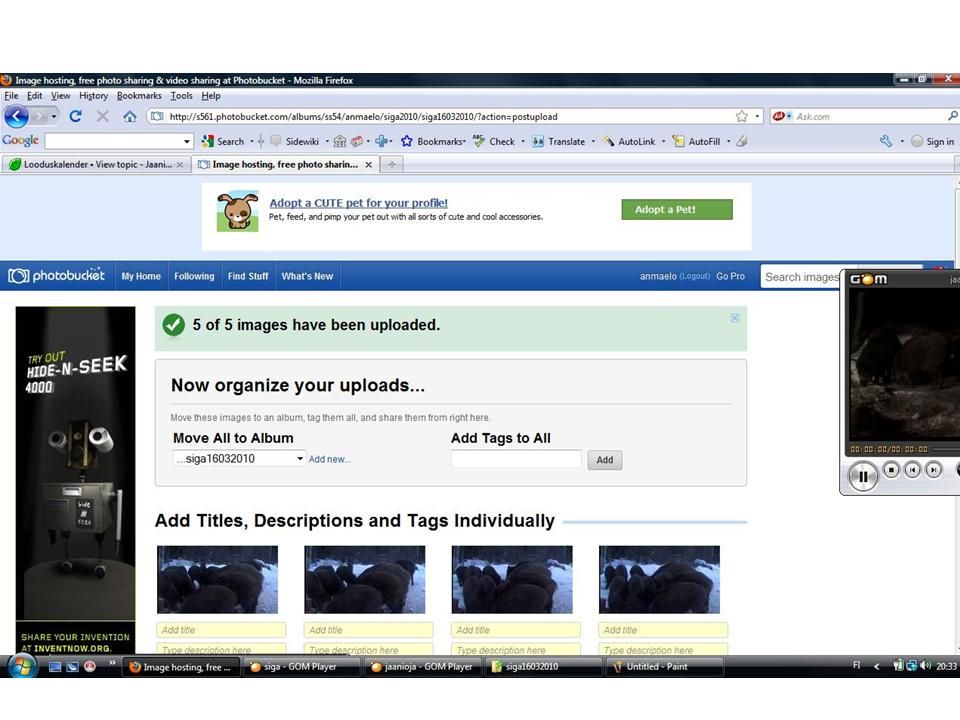
when you scroll down the page you'll see in the bottom a blue bar with the text: "Save and share now". press on that text with the left mouse button.
när du rullar sidan ner ser du där under den en blå balk med text "Save and share now". pressa på den texten med musens vänstra knapp.
kun vierität sivun alareunan näkyviin, näet sinisen palkin, jossa lukee "Save and share now". paina sitä hiiren vasemmalla napilla.
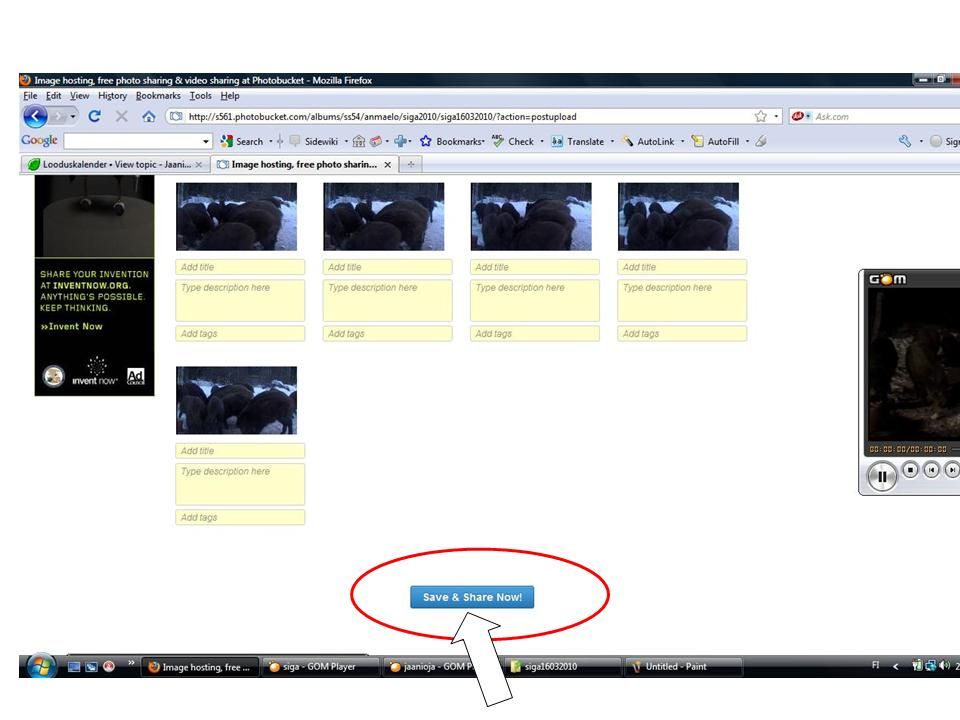
the title on the next page will be "Share Your Uploads!", and under that you will see icons of your picture(s).
den nästa titeln på toppen av sidan blir "Share Your Uploads!" och under den ser du ikoner av dina foto(s).
seuraavan sivun otsikko on :"Share Your Uploads!", ja sen alla näkyvät kuviesi ikonit.

Re: Adding images
Posted: March 21st, 2010, 2:56 pm
by ame
when you scroll down the page you'll see under the picture icons a blue bar with the text "Return to album".
när du rullar sidan ner ser du under fotoikoner en blå balk med text som säger "Return to album".
kun vierität sivun alalaidan näkyviin, näet kuvaikonien alla sinisen palkin, jossa lukee "Return to album".
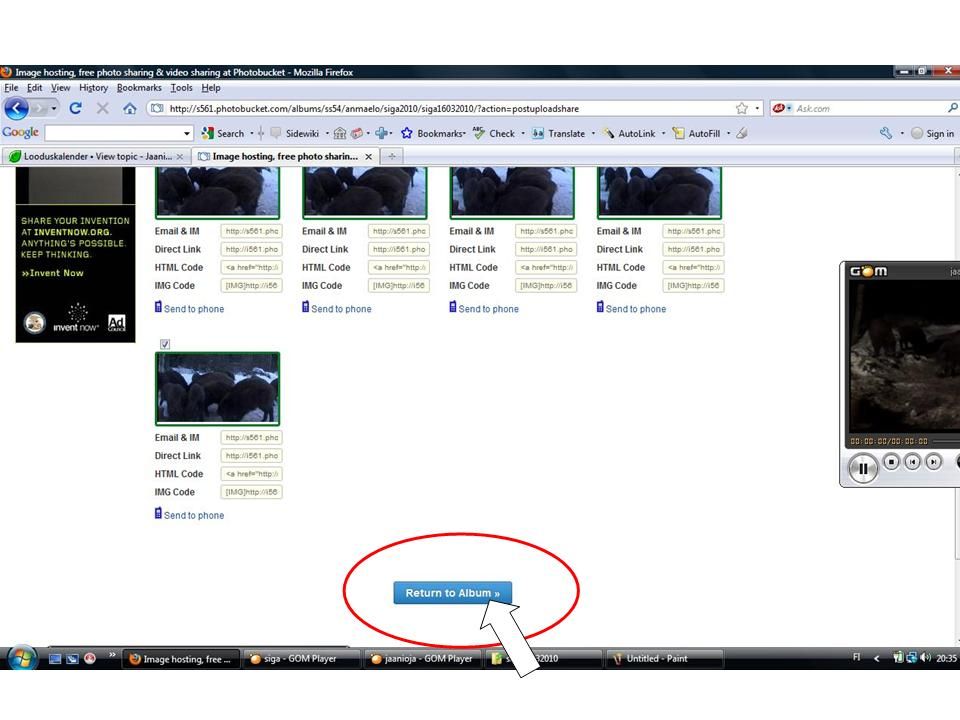
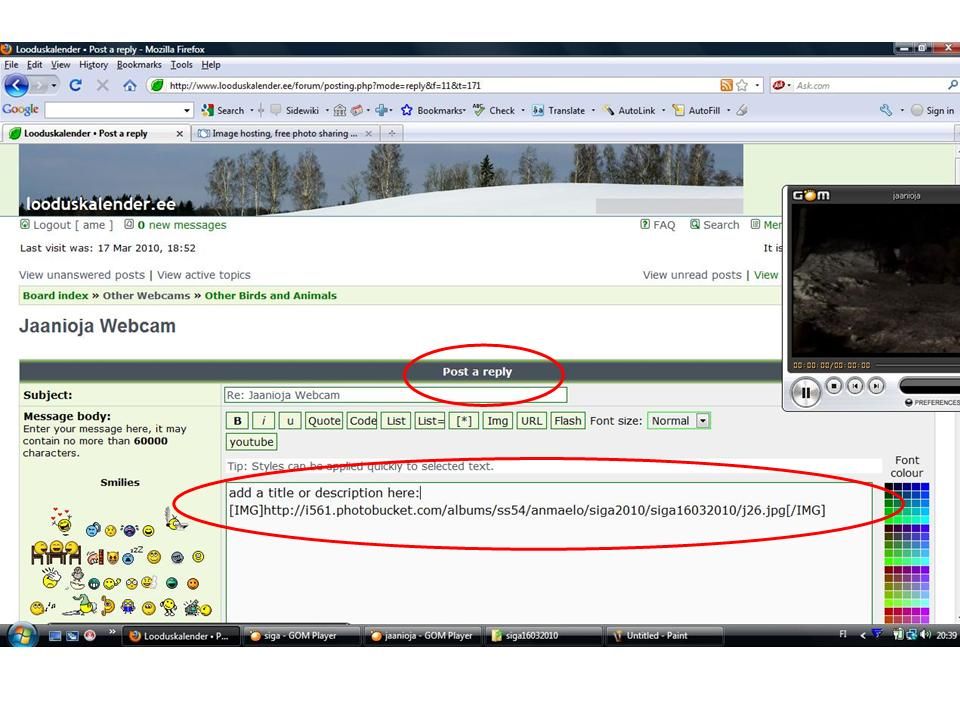
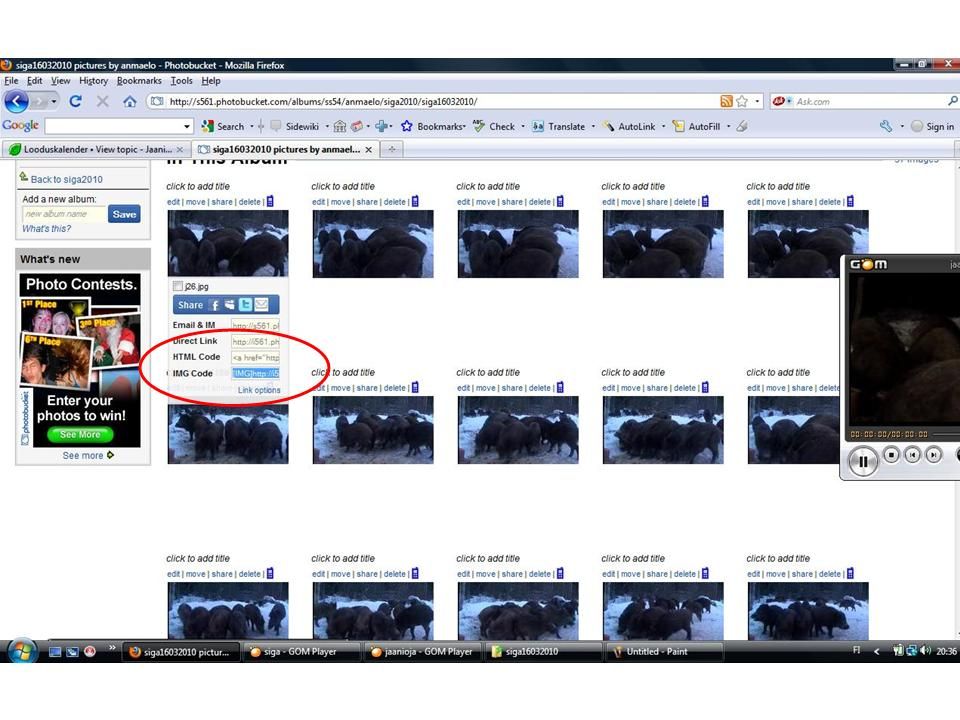
before "Return" (or after that at any time when you are in your P-bucket account) you should first move the mouse arrow on the picture icon (yellow arrow), then move it slowly down (white arrows) to the bottom line under the icon where there is first the text "IMG Code", followed by the code. point the arrow on the code (bluish-green arrow) and press on it with the left mouse button.
före "Return" (eller efteråt när som hellst i ditt P-bucket-konto) kan du röra musen först på bildens ikon (gula pilen), sen rörä pilen långsamt ner (vita pilar) på den lågsta raden under din foto's ikon (där det sägs "IMG Code") på den text som finns därefter (blå-gröna pilen). pressa på den lågsta raden med musens vänstra knapp.
ennen "Return"ia (tai myöhemmin milloin tahansa P-bucket-tililläsi ollessasi) voit asettaa hiiren nuolen kuvaikonin päälle (keltainen nuoli), liu'uttaa hiirtä hitaasti siitä alas (valkoiset nuolet) alimmalle riville, jonka alussa lukee "IMG Code", sen perässä olevan tekstin päälle (sinivihreä nuoli). paina sitä hiiren vasemmalla napilla.
the text will turn blue. copy the IMG-code by pressing Ctrl-c (push first Ctrl-button down, keep it down and then press c at the same time.)
då blir texten blå. sen skall du kopiera IMG-coden med Ctrl-c (först hålla ned Ctrl-knappen och sen med samma tid pressa c).
teksti muuttuu siniseksi. kopioi se painamalla Ctrl-c (paina ensin alas ja pidä alhaalla Ctrl-nappi ja paina sitten c).
Re: Adding images
Posted: March 21st, 2010, 3:08 pm
by ame
Re: Adding images
Posted: March 21st, 2010, 7:19 pm
by Olga
Re: Adding images
Posted: March 22nd, 2010, 10:15 am
by ame

yeaahh, it's still a bit "in a phase" (
'vaiheessa' 
)... i'll develop it a bit further when i have time...
i thought that posting pictures here on LKF doesn't require much skill in writing English, so it is an easy way of participating,
providing that you know how to capture pictures in the first place, and then how to attach them in posts. then i thought that there must be a lot of members who have quite recently (at the age of 50
+ years) bought their first computer, and don't know much about how to use it (like the mother of my friends: she's 75 and bought herself a computer recently). these people need step-by-step instructions in their own language to get started.
 so if anyone of you wishes to make these instructions in your own language, you are quite welcome to borrow my pictures up there.
Re: Adding images
Posted: March 22nd, 2010, 12:02 pm
by Olga
ame [quote]need step-by-step instructions in their own language to get started. /quote] yes, and there nothing to shame that older people, maybe some younger too, do not get the matters in one second. I'm so thankful to some Estonian member who helped me with my own language Finnish - maybe he replyed in English, but anyway, step by step!
I close to 60 when I got PC.
Re: Adding images
Posted: March 22nd, 2010, 9:59 pm
by Jo UK
Ame, what an admirable task you have completed. Congratulations.
As you say, pictures count for much of our communication on this forum. We can manage with the occasional stumble in English, but the picture tells the story!
Well done for welcoming the silver-haired wise ones here!
Re: Adding images
Posted: March 23rd, 2010, 5:00 pm
by ame
thanks, Jo.

i guess/hope that this will help younger members, too, not just silver-haired ones.
(i'm turning silver myself at accelerating pace, especially after i decided that i won't dye my hair anymore.... i got so strange purple shades lately that i decided that that was it. )
Re: Adding images
Posted: March 25th, 2010, 1:27 am
by macdoum
Ame thats a work of Herculean proportions.

We all thank you..
Now,one of these days I'll have to sit down in front of this 'ere computer and
PRINT all your instructions and I'll go from there.. :peek:
Re: Adding images
Posted: March 28th, 2010, 7:40 pm
by Rionn
Ame, you asked me to tell about the Dutch programm to add an image. Because it is a dutch programm it will be used by other dutch users. And that's why I will write this in Dutch.
Het programma dat ik gebruik om een foto te uploaden naar het internet heet fotopocket.nl.
http://www.fotopocket.nl/
Allereerst maak ik een printscreen. Zelf doe ik dat met de printscreen toets op het toetsenbord. Dan ga ik naar Paint, een Windows programma, te vinden bij de bureauaccesoires. Klik op bewerken en plakken, en sla de foto dan op.
Vervolgens open je met je browser fotopocket.nl en bij 'afbeelding' kun je bladeren naar de zojuist opgeslagen foto. Dubbelklik die aan en ga dan naar 'nu uploaden'
Na even wachten krijg je een aantal mogelijkheden. Ik kies dan de mogelijkheid IMG voor forums 1. Kopieer deze link en plak hem in het berichtenvenster op het forum. Dat is alles. Succes.